
Do you want to master the art of applying eyeshadow but don’t know where to start? Well, here are 8 simple steps to blend and apply your eyeshadow and create a statement eye look like a pro!
Step 1: Prime Your Eyes
You first need to prime before reaching for your eyeshadow. Priming the eyes is a must to ensure your eyeshadow goes on smoothly and wears evenly throughout the day.
*ele tip: If you haven’t found the ultimate eye primer yet, I recommend trying either the SMASHBOX 24hr eye primer or the NARS smudge-proof eyeshadow base. The perfect choices for all-day longevity.
Step 2: Crease Colour
Now it’s time to lay down the structure of your eyeshadow. You want to choose a mid-tone matte brown shade for your crease colour.
This colour is applied with a fluffy blending brush through the crease of the eye.
Start the application on the highest point of the outside corner of the crease and work the colour back and forth in ‘windshield wiper’ motions.
Once you’re happy with the depth of colour and most of the pigment is off your brush, it’s time to blend.
Blend out the edges with little circular motions to diffuse the colour and ensure that there are no harsh edges. When blending is complete you should have a wash of colour in the crease that is visible when you look straight ahead in the mirror.

Step 3: Create Depth
Choose a colour that is darker than the first colour you used (the darker the shade, the more intense your eye look will turn out). Apply your chosen colour with a small blending brush using back and forth motions.
Start just with running the majority of the deeper colour along the outer third of the lash line.
Once you’re happy with the depth, use the same brush (with no extra product added) in small circular motions to blend the edges out and connect this darker colour into our crease shade. You want the two shades to meet but still want this darker shadow to sit lower than the crease colour.
*ele tip: Always remember: ‘When in doubt, use circular motions to blend it out!’
Step 4: Neutral lid colour
I recommend reaching into your shimmer shadows for your statement eye look. This helps create light and add intrigue to the look. Use a flat packer brush to get the most pigment on your eyeshadow. Starting in the centre of the eye, use a ‘press and wiggle’ motion to apply the colour from the inner corner of the eye all the way to meet the darker colour that we applied earlier.
You want to overlap these shades but ensure you don’t completely cover up the darker colour as this is what creates the light to dark fade.
*ele tip: Intensify the sparkle in your shimmer eyeshadows: Before applying the pigment to your eye spray two-three sprays of setting spray (my go-to is MAC fix +) on to the brush loaded with product and this will transform your powder eyeshadow into this stunning foiled cream finish in the eye.
Step 5: Inner Corner and Brow Bone
To open up the eyes; take a light eyeshadow and dab this into the inner corner of the eye. This ensures that even while you are rocking a statement eye you are still looking well rested! Take the same light colour you used on your inner corner and run it under the brow.
*ele tip: The tip of your pinkie finger is the ultimate tool to apply your inner corner highlight. When it comes to the placement on the brow bone, you want to ensure this highlight is softly placed right under the arch of the brow. This will help create lift to the eye. Too much brightness all over the brow bone can have the opposite effect.
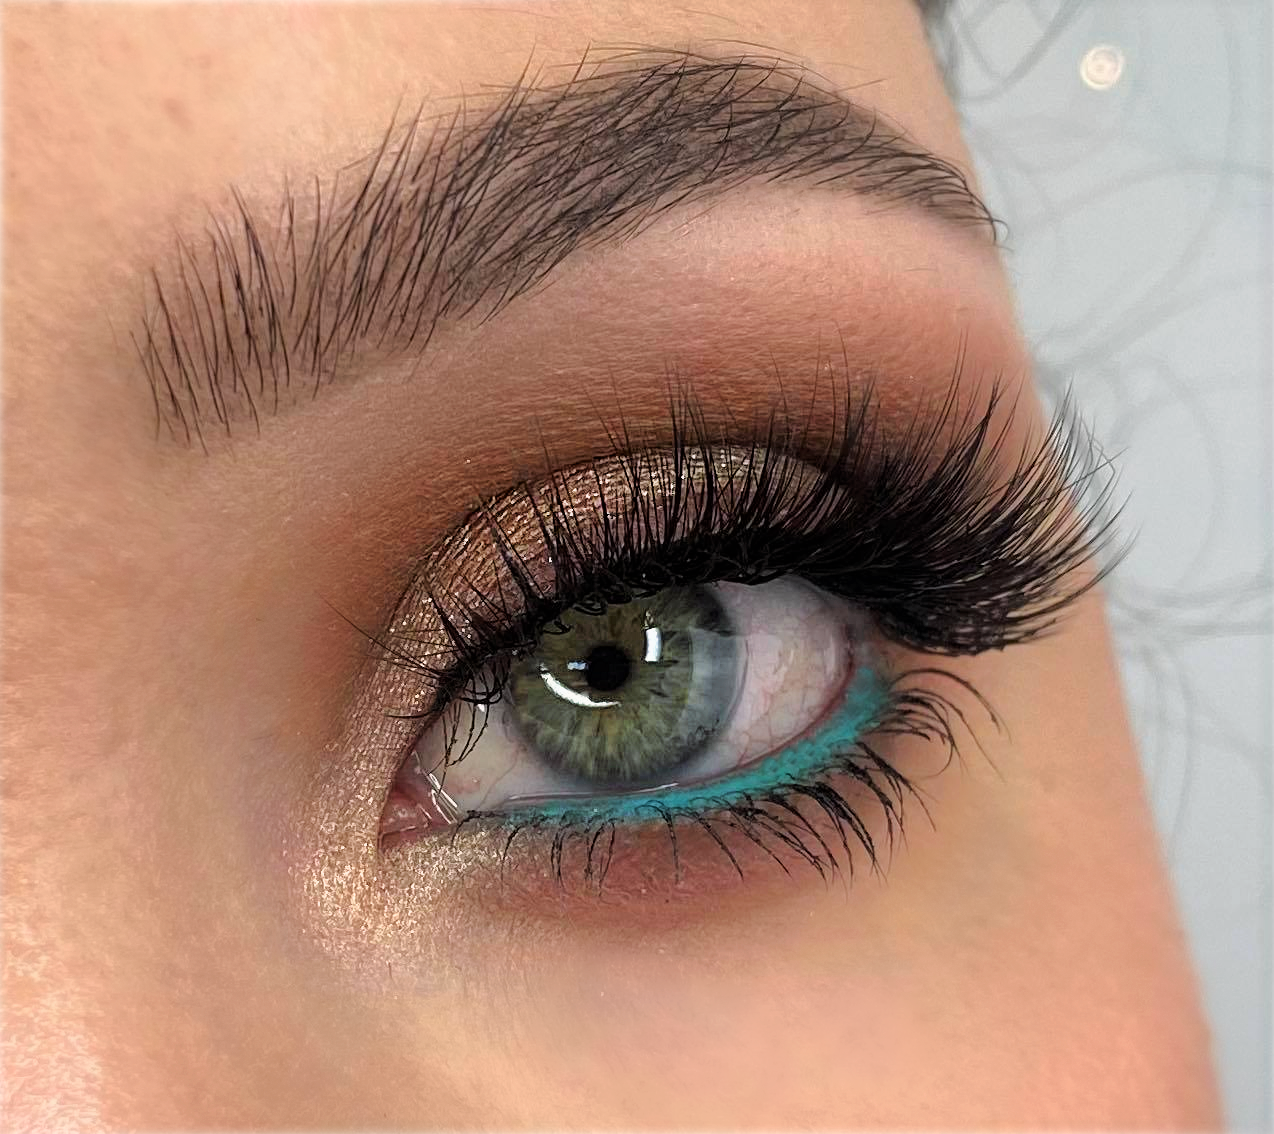
Step 6: Waterline
To add a pop of colour to your statement eye, run your favourite bright eye liner along your lower waterline (I opted for a vivid turquoise for my look.) Make sure you choose an eyeliner designed to be applied on the waterline for maximum colour payoff.
*ele tip: Using a bright colour on the lower waterline is a fantastic way to add colour to an eye look in a more subtle way and really makes the colours of your eyes stand out!
Step 7: Bottom Lash Line
Bring the look all together using the same mid-tone brown shade you used in step one. Use a small, bullet brush to smoke out and diffuse the colour all the way from inner corner to outer corner with a back and forth motion.
*ele tip: If you are unsure how far to take the colour down on the lower lash-line, use your lashes as a guide of where to end the colour. It may look intense to begin with but when you finish off with mascara it creates this beautifully soft ‘peek-a-boo’ of colour from underneath your lashes.
Step 8: Eyeliner and Mascara
Finish off the top of the eyes by running a brown eyeliner along the top lash line. Eyeliner helps create depth right by the lashes to give them a fuller, thicker effect. I recommend a brown liner as this adds richness to the lash line without being stark like a black liner.
Finally, coat your top and bottom lashes with mascara and you have finished creating the ultimate statement eye with a pop of colour!
*ele tip: If using an eyeliner makes you nervous, then use a soft kohl pencil along your lash line to create a rough line, then use an angled liner brush to soften the edges. It creates a perfect smokey, even line every time!
Want more? Click here for Creating a Perfect Red Lip Look and here for a Day to Night Makeup Look.
Pingback: How To Apply Blush -